Mech Engineering Drawing-MED Skip to main content

ISOMETRIC DRAWING


Isometric Drawing - mechengineeringdrawing.blogspot.com


INTRODUCTION OF ISOMETRIC DRAWING


An Isometric Drawing is such a drawing that even a common man without any technical knowledge can understand very easily the size and shape of a component. This is also called a Three-dimensional drawing because in an Isometric Drawing there are three mutually perpendicular axes ( plural form of 'axis' ) that meet at a common point and also make an angle of 120° with each other. In the following picture provided, assume three axes named X, Y, and Z make a 120° angle with each other and meet at a point 'O'.


Isometric Drawing
Isometric Drawing


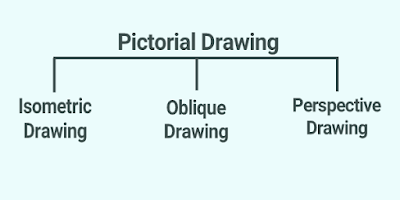
Actually, Isometric Drawing is a type of Pictorial Drawing. A pictorial drawing can be classified into three groups.....


1) Isometric Drawing

2) Oblique Drawing

3) Perspective Drawing.


Classification of Pictorial Drawing


In some places, Orthographic Drawing is also added as a sub-category of Pictorial Drawing but this is not true as Orthographic Drawing is a kind of Layout Drawing. In the future, we will discuss in detail the differences between Pictorial Drawing and Layout Drawing.

However, out of the above-mentioned three sub-categories of Pictorial Drawing, Isometric Drawing, and Oblique Drawing have very much application in machine shop and metal working departments group whereas Perspective Drawing has a huge application in the civil engineering group of branches.


WHAT IS ISOMETRIC DRAWING


It is a technical method of visual or pictorial representation of three-dimensional objects for use in the field of engineering.
     
In an Isometric Drawing, the object makes an angle of 30° with the horizontal plane. Whereas it makes angles 60° & 120° with its plane of projections. For why the three coordinate axes come to meet at a single point and the angle between any two of them is 120° (degrees), thus sometimes it is also called an Axonometric Drawing.

In an Isometric drawing, all dimensions are drawn at full scale or any other scale ratio concerning the true dimensions of the component. These true dimensions can be obtained from either drawings completed in orthography or by measuring the object.


HOW TO START TO DRAW AN ISOMETRIC DRAWING


To start an Isometric Drawing of any kind of object, first of all, we should have to consider that the object must have its length, width, and height or the object has its three-dimensional axes.
Let us assume a 'cube' which we need to draw its isometric drawing. 

Step 1: First of all, we need to draw three lines ( which would represent the three mutually perpendicular edges of that cube ) in such a manner that all three lines would come to meet a single point ( assume point 'A' ) and this 'A' point is resting upon horizontal line or horizontal plane. Moreover, two lines of those three lines, make an angle of 30° with the horizontal plane and the other line makes an angle of 90° with the horizontal plane or vertical with the horizontal plane, as shown in the following image.


HOW TO START TO DRAW AN ISOMETRIC DRAWING


Step 2: After drawing two 30° lines and one vertical line, with the help of set-squares, BD and CF need to be drawn parallel to vertical line AE which would represent the height of the cube. Join DE and EF as shown in the following image.


HOW TO START TO DRAW AN ISOMETRIC DRAWING


Step 3: Draw a parallel line of AB from point F and draw a parallel line of AC from point D, with the help of set-squares. DG and FG meet at a point G, as shown in the following image.

                                  OR

Take AB as the radius with your compass and make arcs from centering the pointer of your compass on points D and F respectively. Both arcs cut a point on G Join DG and FG. That's it!


ISOMETRIC DRAWING
ISOMETRIC DRAWING


ISOMETRIC AXES


In Isometric Drawing, those basic three lines that represent the three mutually perpendicular edges of any object are called jointly the Isometric Axes. Individually they are called the Isometric Axis.


Isometric Axes
Isometric Axes


Generally, at the time of drawing an isometric drawing of any object, those axes are kept in front position but it solely depends upon the geometrical shape of the object.


ISOMETRIC LINES AND NON-ISOMETRIC LINES


In an isometric drawing, such lines that are parallel to any of the isometric axes are called Isometric Lines and those lines that are not parallel to any isometric axis are called Non-Isometric Lines.


ISOMETRIC DRAWING
ISOMETRIC DRAWING


The above isometric drawing shows an image of a 'V-block'. In that isometric drawing, all the lines except FD and GD, are parallel to any axis of isometric axes. So, in the above isometric drawing, AB, AC, BL, AE, CH, EF, GH, IJ, and KL are the Isometric lines. Whereas  FD, GD, and their parallel lines also are Non-isometric lines.

The length of Non-isometric lines of any object will not depend upon the scale ratio used to draw for isometric lines though non-isometric lines are drawn with the help of its adjacent isometric lines. Generally, non-isometric lines are always used to draw the slant faces or planes of the object, and moreover, the object is resting at an angle of 30° with the horizontal plane in the isometric drawing. For these reasons, non-isometric lines are drawn at the very least by locating their starting point and end point from their adjacent isometric lines. To locate of endpoints of non-isometric lines with the help of adjacent isometric lines, there are two methods have been deployed. Those are...


1) Off-set method and

2) Box method.

OFFSET METHOD IN ISOMETRIC DRAWING

As the name indicates the procedures of this method. This method is very much suitable for those objects that consist of many numbers of slant faces or planes at many numbers of different angles. 


BOX METHOD IN ISOMETRIC DRAWING

In this method, the object is assumed to be inside a square, parallelogram, or rectangular box. The box structure depends upon the size and shape of the component. The starting points and end points of these non-isometric lines are located and by joining these points an isometric view is obtained.

We will see and learn about these steps more briefly at the time of application of Isometric drawing of various types of objects later.


ANGLES IN ISOMETRIC DRAWING


As said earlier, in an Isometric Drawing, the object makes an angle of 30° with the horizontal plane. Whereas it makes angles 60° & 120° with its plane of projections. The actual angles of surfaces of any object will not have the value in the isometric drawing and because of this reason, angles in the isometric drawing are also termed as Isometric Angles. The isometric angle value will be more in some cases and will be less in other cases than its actual or true value of inclination.
For example, in the isometric view of a prism shown below, the actual or true value of all angles of surfaces is 90°. But in isometric drawing the angles are 60° and 120°.


ANGLES IN ISOMETRIC DRAWING
ANGLES IN ISOMETRIC DRAWING OF A PRISM


CIRCLES, SQUARES, AND RECTANGLES IN ISOMETRIC DRAWING


As the term indicates, the true shape of circles, squares, and rectangles will also be changed in an isometric drawing and these are termed Isometric Circles, Isometric Squares, and Isometric Rectangles respectively. The figure shown below is an example of these.


CIRCLES, SQUARES AND RECTANGLES IN ISOMETRIC DRAWING
Circles and Squares in Isometric Drawing


As shown in the figure above, the true shape of a circle will be Elliptical in shape after a change in an isometric drawing and it is termed an Isometric Circle. Just like a circle, the true shape of a square and a rectangle will be Rhombus and Parallelogram respectively in shape after change in an isometric drawing and these are termed as an Isometric Square and Isometric Rectangle as described above.


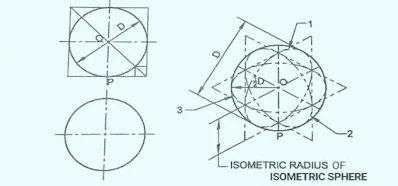
SPHERES IN ISOMETRIC DRAWING


The actual or true shape of a Sphere which can be seen in an orthographic view is a complete circle of equal radius from any direction and it is equal to the radius of the sphere. Hence, the shape of a sphere in an isometric drawing is also a circle of the same diameter as the sphere in true shape and it is termed an Isometric Sphere as shown in the figure below.


SPHERES IN ISOMETRIC DRAWING


Marked Valuable Posts!

IMPORTANT SHORT QUESTIONS AND ITS ANSWERS FROM ENGINEERING DRAWING INSTRUMENTS

  ●  Fill in the blanks type Questions :   1.  The full form of BIS is ……………………… Ans:  Bureau of Indian Standard. 2.  The inclination of inclined lettering as per BIS is ……………………. Ans:  75° 3.  Set squares are used for drawing ……………………. lines. Ans:  Parallel [ Vertical, Horizontal, Inclined ]. 4.  Angle of multiple of as constructed by the combined use of …………… & ………….. Ans:  T-SQUARE & SETS SQUARE. 5.  In the absence of protractor, ………………………. Is used to measure angles. Ans:  Angle of Chords. 6.  The scale of chords is used to measure ……………………….. Ans:  Angles. 7.  Two methods/systems to represent the dimensions are …………………. and …………….. system.  Ans:  Aligned and Unidirectional. 8.  Lettering is usually done in ……………….. letters. Ans:  Capital. 9.  The size of the letter is described by its ………………………….  Ans:  Height. 10.  Single stroke letters may be either …………………… or ………………………… Ans:  Vertical or Inclined. 11.  The dimension line should not ………………………. each other. Ans:  Cross / I

LAYOUT OF BORDERS AND TITLE BLOCK ON DRAWING SHEET

Post Summarization: ● Introduction. ● Size of drawing sheets. ● Margin. ● Borderlines. ● Title block. ● Rules for selecting Titles. ● Revision Table. ● Notes. ● Tutorial Videos (Coming Soon!) INTRODUCTION: A drawing sheet consists of an engineering drawing and must have some other aspects too i.e. Border lines, Title block, Notes, etc for better demonstration of the drawing. The layout of border lines and title blocks should always be done in some specific manner on the drawing sheet as it's not only a necessity for increasing the visual orientation of the drawing sheets, moreover, these help to read the drawing sheet more speedily in a systematic way. SIZE OF THE DRAWING SHEET: The size of the drawing sheet in detail can be found in the  TECHNICAL DRAWING AND INSTRUMENTS of this blog. MARGIN: Margin or Marginal lines are drawn on the drawing sheet only where the untrimmed size of the drawing sheet is provided. Generally, in the paper industry, trimmers are used to trim drawing sh

IMPORTANT SHORT QUESTIONS & ITS ANSWERS ON CURVE & LOCI

IMPORTANT SHORT QUESTIONS : 1.  A locus is the path of a point which moves in ……………………… Ans:  Same plane. 2.  When the section plane is inclined to the axis and is parallel to one of the generators, the section is a ………………… Ans:  Parabola. 3.  When the section plane is inclined to the axis and cuts all the generators, on one side of the apex, the section is an ……………….. Ans:  Ellipse. 4.  When the section plane cuts both the parts of the double cone on one side of the axis, the section is ……………. Ans:  Hyperbola. 5.  If eccentricity (e) of a curve is equal to 1, the curve is said to be ………………. Ans:  Parabola. 6.  If eccentricity (e) of a curve is less than 1, the curve is said to be ………………. Ans:  Ellipse. 7.  If eccentricity (e) of a curve is greater than 1, the curve is said to be …………. Ans:  Hyperbola. 8.  The ………… is the point at which the conic cuts the axis. Ans:  Apex / Vertex. 9.  The ………….. is the point at which the generator cuts the axis. Ans:  Apex / Vertex. 10.  The point at

LETTERING

 LETTERING: INTRODUCTION Writing titles on drawing sheets, dimensions on drawing objects, special notes, and other important particulars on a drawing is called Lettering. It is a very important step in an engineering drawing. Lettering should, therefore, be done properly in a clear, legible, and uniform style. It should be in plain and simple style so that it could be done freehand and speedily. Any ornamental style must be avoided lettering in engineering drawings. Though accurate and neat drawings may be drawn yet sometimes, their appearance is spoiled by ornamental lettering or sometimes, their usefulness is decreased by poor lettering.   Note:  The use of drawing instruments in lettering takes considerable time and hence, it should be avoided to save time, especially in the examination hall. Efficiency in the art of lettering can be achieved by careful and continuous practices. **Actually, a free hand drawing means, "keeping almost the same visual shape, you can draw any comp

IMPORTANT! Short Questions and Answers from SCALE

  IMPORTANT SHORT QUESTIONS AND ANSWERS FROM SCALE 1. An instrument used to measure the length or distance between two objects or points, termed as.................. Ans: Scale. 2. The scale of chords is used to measure ……………………….. Ans: Angles. 3. The ratio of drawing length to the actual length of an object is called ………………………. Ans:   Representative Fraction. 4. When measurements are required in two units or a unit and its subdivision, the ………………… is used. Ans:   Plain scale. 5. When measurements are required in three units, the …………………. Scale is used. Ans:   Diagonal. 6. When a drawing is drawn of the same size as that of the object, the scale used is …………………. Ans: Full-size  scale   7. When drawings are drawn smaller than the actual size of the object, the scale is said to be ………….. Ans:   Reducing scale 8.   R.F. is the ratio of .................................. to the .................................. Ans: Drawing Length of an object, Actual Length of that object. 9.

TECHNICAL DRAWING AND INSTRUMENTS

What is Technical Drawing? What is the necessity of Technical Drawing?  Technical drawing or drafting, is the demonstration and discipline of composing drawings that visually communicate how something capacities or is developed. Technical drawing is basic for imparting thoughts in industry and engineering. To make the drawings more clear, individuals use familiar symbols, perspectives, units of measurement, notation systems, visual styles, and page design. Together, such conventions constitute a visual language and help to guarantee that the attraction is unambiguous and moderately straightforward. A large number of the images and standards of Technical drawing are systematized in an international standard called ISO 128.  The requirement for exact correspondence in the arrangement of a practical record recognizes specialized drawing from the expressive drawing of the visual expressions. Creative drawings are emotionally deciphered; their implications are duplicated and decided. Specia

INTRODUCTION OF ENGINEERING DRAWING

INTRODUCTION OF ENGINEERING DRAWING Simply you can say, it is a special type of language globally used for engineers or technical persons to communicate between them for fulfillment of target or making any geometrical shaped object or rather say any project. Suppose, there is a building or bridge construction or maybe the construction of an electric or power substation, or maybe in a mechanical workshop, we need various types of technical persons or specialists for construction or production. As an example, some engineers ensure the stability of load capacity of the ground and how much load can bear that ground by doing the field survey, some technical persons or engineers develop the structure or construction, and some technical person completes the fabrication ( i.e. riveting or welding ) portions, some technical persons or engineers develop the electrical supply connections and so on. All technical persons and engineers come together to complete a project or projects but they all n

SCALE

INTRODUCTION TO SCALE :   Scales are made of wood, steel, celluloid plastic, or cardboard. 15 cm long and 2 cm wide or 30 cm long and 3 cm wide level scales are in Common use. They are ordinarily around 1 mm thick. However, a  15 c.m. long and 2 c.m. wide scale is considered a Standard length of scale.  By using scale, small components can be drawn with the same size as the components are actually. A 150 mm long pen or 175 mm long pencil may be shown by a drawing of 150 mm length or 175 mm length respectively. Drawings of the same size as the objects are called full-size drawings and ordinary full-size scales are generally used to draw such drawings. A scale is determined by the ratio of the dimensions of an element as represented in a drawing to the actual dimensions of the same element. This is called R.F. or Representative Fraction of Scale. The scales are generally classified as : (1) Plain scales (2) Diagonal scales (3) Vernier scales (4) Comparative scales (5) Scale of chor