Mech Engineering Drawing-MED Skip to main content

GEOMETRIC CONSTRUCTIONS (Part-A)

Geometric-Constructions-or-Geometrical-Constructions-mechengineeringdrawing.blogspot.com

Geometric Constructions or Geometrical Constructions are mostly based on the basic simple geometry, though which is essential in the preparation of Engineering Drawings.


Without having better knowledge and practice in Geometric Construction, it is very difficult to complete any kind of Engineering Drawing.


The most commonly and generally used geometric constructions to construct any kind of engineering drawing are described below:


(1) To draw perpendiculars of a given line.

(2) To draw parallel lines.

(3) To bisect or equally divide a given line into two parts.

(4) To divide a line into any number of equal parts.

(5) To bisect (Divide into two equal parts) an angle.

(6) To divide a circle.

(7) To trisect (Divide into three equal parts) an angle.

(8) To draw an arc with a given radius.

(9) To draw tangent and normal.

(10) To draw a continuous curve.

(11) To construct an ogee or reverse curve.

(12) To draw a loop of three (3) circles pattern.


[For simplicity, we'll discuss No.1 to No.5 as 'Part-A' on this page and No.6 to No.12 as 'Part-B' on a different page.]


PART - A


(1) How to draw perpendiculars of a given line from a given point.


Drawing a perpendicular (90°) to a given line from a given point outside of the line can be obtained very easily with the help of either a protractor, set squares, or a compass.


However, here we shall discuss drawing perpendicular lines with the help of a compass only. Those methods are described as under:


(a) When the given point is out of the given line but nearer to the center than the end of the given line (see Fig.).


Let's consider a given line AB with any suitable length and C is the point.


To draw a perpendicular line on a given line with the help of compass-mechengineeringdrawing.blogspot.com

(i) With center C and any convenient radius, draw an arc cutting the given line AB at E and F, respectively.


(ii) With any radius greater than half of EF and taken centers as E and F, draw the arcs intersecting with each other, on both sides of the given line at points C and G.


(iii) Draw a line joining C and G with a straight line.


Hence, CG is the required perpendicular line.


(b) When the given point is out of the given line but nearer to the end than the center of the given line (see Fig.).


Let's consider AB to be the given line and P the point.


To draw a perpendicular line on a given line with the help of compass-mechengineeringdrawing.blogspot.com

(i) With center A and radius equal to AP, draw an arc PNP'.


(ii) With center N and radius equal to NP, draw an arc PMP'.


(iii) Draw a line joining P and P' and intersecting AB at F.


Then PP' is the required perpendicular on the given line.


(C) When the given point is anywhere on the given line (see fig.).


Let us consider, AB is a given line and P is the given point where we need to draw a perpendicular line.


perpendicular-line-from-a-given-point-on-a-given-line-mechengineeringdrawing.blogspot.com


(i) With P as the center and with any convenient radius, draw an arc that cuts AB at point C.

(ii) Now from point C, keeping the same radius, inscribe the arc into two equal divisions CD and DE respectively.

(iii) Again with the same radius and taking centres as D and E respectively, draw arcs intersecting each other at Q. Draw a straight line joining P and Q.

Then PQ is the required perpendicular line.


(D) When the given point is in the middle of the given line (see fig.).


Perpendicular-bisector-mechengineeringdrawing.blogspot.com.jpg

(i) Let us consider AB as the given line. Taking a radius with a minimum half of AB and a maximum up to the length of AB, draw an arc from point A.

(ii) Similarly, taking center as B point and with the same radius draw another arc which cuts the previous arc at point O.

(iii) Now, join the middle point of the given line and point O with a straight line which is our required perpendicular.


Note: A perpendicular line that bisects or equally divides a straight line into two parts is called a Perpendicular Bisector of that straight line.


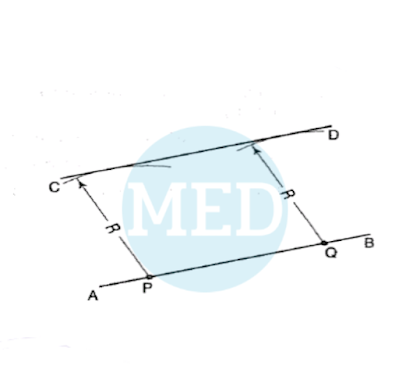
(2) How to draw a parallel line through a given distance or point and to a given straight line.


Parallel lines from a given point to a given straight line - www.mechengineeringdrawing.blogspot.com

Let AB be the given line and a parallel line should be drawn at 25 mm apart from the AB line.

(i) Consider two separate points P and Q are on the AB line.
From point P and Q, draw two perpendiculars with the help of set-squares.

(ii) Now keeping P as the center, draw an arc with a 25 mm radius on CP (perpendicular line).

(iii) Similarly, taking the center as Q, draw an arc with a 25 mm radius, cutting the DQ perpendicular to point D.

(iv) Now join point C and point D by means of a straight line.

Then CD which is 25 mm distant from line AB and is the required parallel line of AB.


(3) How to bisect or equally divide a given line into two parts.


(i) Let's consider AB be the given line. With center A and radius greater than half of AB, draw arcs on both sides of AB (as shown in fig.).


(ii) Now, with center B and the same radius, draw arcs intersecting the earlier arcs at C and D, respectively.


(iii) Next, draw a line joining C and D and cutting AB at E.

Then AE = EB = ½ AB.


Furtherly, in the case of a curve line or arc, CD bisects AB arc at the right angle (see above fig.).

Let AB be the arc drawn with center O. Adopt the same above method as already described. The bisector CD will pass through the center O.


Watch this Vlog⤵️


(4) How to divide a line into any number of equal parts (say the length of a line is 65 mm and needs to be divided into 5 equal divisions). [Based on Thales Theorem]


Divide a line into any numbers of equal parts - www.mechengineeringdrawing.blogspot.com.jpg
Steps :

Draw a line AB to a convenient length ( suppose 65 mm).

(i) At point 'A' draw a line AC to a required length, such that will form an acute
angle BAC. (Always it is better to form an acute angle).

*An angle with less than a right angle (i.e. angle<90°), is called an Acute angle.*

(ii) Now, inscribe 5 equal arcs with the same radius continuously on the line AC, meeting at 1, 2, 3, 4 & 5. (As many equal parts as required. In this case, it is 5 numbers of equal divisions or parts)

(iii) Join points 5 & B with a continuous thin straight line.

(iv) From points 4, 3, 2 & 1 draw lines parallel to the '5B' line meeting the line 'AB' at 4', 3', 2' & 1' respectively with the help of sets square and pencil.

Now, the line AB is divided into 5 equal parts.

Watch this Vlog⤵️


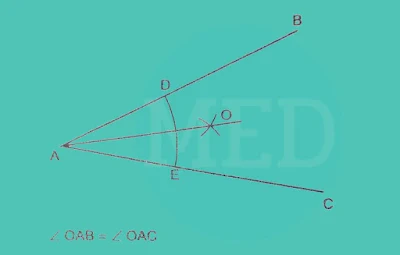
(5) How to bisect a given angle.


Bisect an angle or divide angle in two equal parts-https://www.mechengineeringdrawing.blogspot.com


Let's consider, angle BAC is the given angle.

(i) Now, keeping point 'A' as the center point, draw an arc with any convenient radius to cut the 'AB' and 'AC' lines at 'D' and 'E' respectively.

(ii) After this, taking a radius more than half of the linear length of 'DE' and point 'D' as the center, draw an small arc.

(iii) Similarly, with the same previous radius and taking point 'E' as the center, draw another arc that cuts the previous arc at point 'O'.

(iv) Join points 'A' and 'O' with a straight line.

(v) 'AO' is the bisector of the given angle BAC.

Therefore, angle OAB = angle OAC.


How to bisect Any Given Angle Or Trisect Any Given Angle, Using the Compass method?


Watch this Vlog⤵️


Marked Valuable Posts!

IMPORTANT SHORT QUESTIONS AND ITS ANSWERS FROM ENGINEERING DRAWING INSTRUMENTS

  ●  Fill in the blanks type Questions :   1.  The full form of BIS is ……………………… Ans:  Bureau of Indian Standard. 2.  The inclination of inclined lettering as per BIS is ……………………. Ans:  75° 3.  Set squares are used for drawing ……………………. lines. Ans:  Parallel [ Vertical, Horizontal, Inclined ]. 4.  Angle of multiple of as constructed by the combined use of …………… & ………….. Ans:  T-SQUARE & SETS SQUARE. 5.  In the absence of protractor, ………………………. Is used to measure angles. Ans:  Angle of Chords. 6.  The scale of chords is used to measure ……………………….. Ans:  Angles. 7.  Two methods/systems to represent the dimensions are …………………. and …………….. system.  Ans:  Aligned and Unidirectional. 8.  Lettering is usually done in ……………….. letters. Ans:  Capital. 9.  The size of the letter is described by its ………………………….  Ans:  Height. 10.  Single stroke letters may be either …………………… or ………………………… Ans:  Vertical or Inclined. 11.  The dimension line should not ………………………. each other. Ans:  Cross / I

LAYOUT OF BORDERS AND TITLE BLOCK ON DRAWING SHEET

Post Summarization: ● Introduction. ● Size of drawing sheets. ● Margin. ● Borderlines. ● Title block. ● Rules for selecting Titles. ● Revision Table. ● Notes. ● Tutorial Videos (Coming Soon!) INTRODUCTION: A drawing sheet consists of an engineering drawing and must have some other aspects too i.e. Border lines, Title block, Notes, etc for better demonstration of the drawing. The layout of border lines and title blocks should always be done in some specific manner on the drawing sheet as it's not only a necessity for increasing the visual orientation of the drawing sheets, moreover, these help to read the drawing sheet more speedily in a systematic way. SIZE OF THE DRAWING SHEET: The size of the drawing sheet in detail can be found in the  TECHNICAL DRAWING AND INSTRUMENTS of this blog. MARGIN: Margin or Marginal lines are drawn on the drawing sheet only where the untrimmed size of the drawing sheet is provided. Generally, in the paper industry, trimmers are used to trim drawing sh

IMPORTANT SHORT QUESTIONS & ITS ANSWERS ON CURVE & LOCI

IMPORTANT SHORT QUESTIONS : 1.  A locus is the path of a point which moves in ……………………… Ans:  Same plane. 2.  When the section plane is inclined to the axis and is parallel to one of the generators, the section is a ………………… Ans:  Parabola. 3.  When the section plane is inclined to the axis and cuts all the generators, on one side of the apex, the section is an ……………….. Ans:  Ellipse. 4.  When the section plane cuts both the parts of the double cone on one side of the axis, the section is ……………. Ans:  Hyperbola. 5.  If eccentricity (e) of a curve is equal to 1, the curve is said to be ………………. Ans:  Parabola. 6.  If eccentricity (e) of a curve is less than 1, the curve is said to be ………………. Ans:  Ellipse. 7.  If eccentricity (e) of a curve is greater than 1, the curve is said to be …………. Ans:  Hyperbola. 8.  The ………… is the point at which the conic cuts the axis. Ans:  Apex / Vertex. 9.  The ………….. is the point at which the generator cuts the axis. Ans:  Apex / Vertex. 10.  The point at

LETTERING

 LETTERING: INTRODUCTION Writing titles on drawing sheets, dimensions on drawing objects, special notes, and other important particulars on a drawing is called Lettering. It is a very important step in an engineering drawing. Lettering should, therefore, be done properly in a clear, legible, and uniform style. It should be in plain and simple style so that it could be done freehand and speedily. Any ornamental style must be avoided lettering in engineering drawings. Though accurate and neat drawings may be drawn yet sometimes, their appearance is spoiled by ornamental lettering or sometimes, their usefulness is decreased by poor lettering.   Note:  The use of drawing instruments in lettering takes considerable time and hence, it should be avoided to save time, especially in the examination hall. Efficiency in the art of lettering can be achieved by careful and continuous practices. **Actually, a free hand drawing means, "keeping almost the same visual shape, you can draw any comp

IMPORTANT! Short Questions and Answers from SCALE

  IMPORTANT SHORT QUESTIONS AND ANSWERS FROM SCALE 1. An instrument used to measure the length or distance between two objects or points, termed as.................. Ans: Scale. 2. The scale of chords is used to measure ……………………….. Ans: Angles. 3. The ratio of drawing length to the actual length of an object is called ………………………. Ans:   Representative Fraction. 4. When measurements are required in two units or a unit and its subdivision, the ………………… is used. Ans:   Plain scale. 5. When measurements are required in three units, the …………………. Scale is used. Ans:   Diagonal. 6. When a drawing is drawn of the same size as that of the object, the scale used is …………………. Ans: Full-size  scale   7. When drawings are drawn smaller than the actual size of the object, the scale is said to be ………….. Ans:   Reducing scale 8.   R.F. is the ratio of .................................. to the .................................. Ans: Drawing Length of an object, Actual Length of that object. 9.

INTRODUCTION OF ENGINEERING DRAWING

INTRODUCTION OF ENGINEERING DRAWING Simply you can say, it is a special type of language globally used for engineers or technical persons to communicate between them for fulfillment of target or making any geometrical shaped object or rather say any project. Suppose, there is a building or bridge construction or maybe the construction of an electric or power substation, or maybe in a mechanical workshop, we need various types of technical persons or specialists for construction or production. As an example, some engineers ensure the stability of load capacity of the ground and how much load can bear that ground by doing the field survey, some technical persons or engineers develop the structure or construction, and some technical person completes the fabrication ( i.e. riveting or welding ) portions, some technical persons or engineers develop the electrical supply connections and so on. All technical persons and engineers come together to complete a project or projects but they all n

SCALE

INTRODUCTION TO SCALE :   Scales are made of wood, steel, celluloid plastic, or cardboard. 15 cm long and 2 cm wide or 30 cm long and 3 cm wide level scales are in Common use. They are ordinarily around 1 mm thick. However, a  15 c.m. long and 2 c.m. wide scale is considered a Standard length of scale.  By using scale, small components can be drawn with the same size as the components are actually. A 150 mm long pen or 175 mm long pencil may be shown by a drawing of 150 mm length or 175 mm length respectively. Drawings of the same size as the objects are called full-size drawings and ordinary full-size scales are generally used to draw such drawings. A scale is determined by the ratio of the dimensions of an element as represented in a drawing to the actual dimensions of the same element. This is called R.F. or Representative Fraction of Scale. The scales are generally classified as : (1) Plain scales (2) Diagonal scales (3) Vernier scales (4) Comparative scales (5) Scale of chor

TECHNICAL DRAWING AND INSTRUMENTS

What is Technical Drawing? What is the necessity of Technical Drawing?  Technical drawing or drafting, is the demonstration and discipline of composing drawings that visually communicate how something capacities or is developed. Technical drawing is basic for imparting thoughts in industry and engineering. To make the drawings more clear, individuals use familiar symbols, perspectives, units of measurement, notation systems, visual styles, and page design. Together, such conventions constitute a visual language and help to guarantee that the attraction is unambiguous and moderately straightforward. A large number of the images and standards of Technical drawing are systematized in an international standard called ISO 128.  The requirement for exact correspondence in the arrangement of a practical record recognizes specialized drawing from the expressive drawing of the visual expressions. Creative drawings are emotionally deciphered; their implications are duplicated and decided. Specia